
|
Back to Contents | |
|
|
||
or How Quasimodo Became a Long Distance Runner Bob Silvius rsilvius@mac.com My heart went out to the fellow who happily informed one of the "Brick" venues that he had bought his dream car -- a PV, recently restored to original condition. Now he wanted to know how to go about making a few perfectly reasonable modifications, which included building in an overdrive. The response was immediate and unanimous: "Hey, you nut, don't you dare touch that car. Take it to shows and, if you are really careful, you may drive it there, but we'd rather have you take it on a trailer." Well, that's how it goes. We do love our PV's dearly -- the breed and the individual specimens we drive ourselves, from occasionally, on nice days, to regularly come hell or high water. But I bet there's not a PV owner out there who puts a thousand or more miles per year on the clock who doesn't hear his baby cry: "Please, let me have an overdrive!" It is, indeed, heart-rending to listen to those pistons pumping away furiously, those shafts spinning, valves popping, and exhaust straining to evacuate gasses. Not to mention the anxiety of, while scrutinizing a fickle gas gauge, having to decide between going back to the last gas station you passed, or trying to luck it out till the next one.
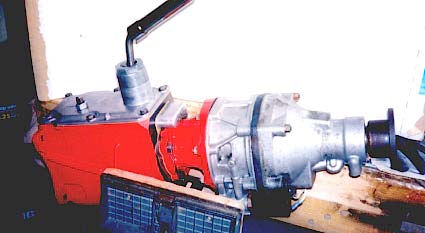
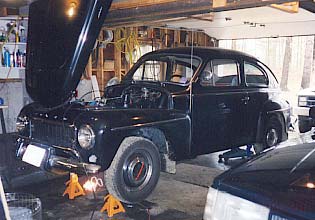
That's why I screwed up my courage and decided to make use of the long Maine winter to build in an overdrive. Now, before you caring guys and gals climb all over me, let me make it clear that my car is a perfectly decent 1962 PV544. It still has a fair amount of its original paint on it. I believe the upholstery is original, though it's in far better condition than one would expect. There is no rot in it anywhere, but it is not a show car, nor will it be while I own it, simply because I wouldn't want to do without driving it for the time it takes to do the restoration. Let's face it, old Volvos are not Lagondas or Bugattis. Their appeal, instead, is that they are durable, easy to maintain, and fun to drive. Now, this is the tale of how I went about finagling an M41 into my PV, so, by rights, this thing should be written in the first person singular. But writing in the vain of "first I did this and than I did that" gets to be a bore after a while. So, when I lapse into the second person, I do it more for the sake of variety than out of an affinity for pedagogic didacticism. Some people like to use the indefinite pronoun "one," but I don't, unless I have a great, universal truth to reveal, which happens only rarely in this story. Deciding to undertake something I knew absolutely nothing about meant that I had to put a lot of, in retrospect, dumb questions to many patient and helpful people -- most of them denizens of the Internet. Inevitably, I found out that to get useful answers, you need to ask the right questions, and you can save yourself and others a lot of time and effort by doing your homework and finding out what questions have already been asked and answered. I was extremely fortunate to have Dave Rauch graciously consent to hold my trembling hand as I wandered into this terra incognita of automotive messing, and much of what I have to tell I found out from him. And another thing: don't let the size and complexity of the job scare you. Building anything always looks complicated when you contemplate the whole project, particularly if you are doing it for the first time. But you're never working on the whole thing all at once, just on manageable pieces of it, one at a time. It's not so much the complexity of the project one should be concerned about as the time it takes. But, since every job can be broken down into smaller tasks, and every task completed provides a satisfaction fix, time passes swiftly. That's how some of us get hooked on projects. There is no better place to start your homework than with the drive-train articles in the Tech Archive of VClassics. Then check out Duane Hoberg's "M-46 Overdrive Overhaul and O-Ring Repair and Replacement" at www.brickboard.com/FAQ/700-900/. Scroll through the Brickboard archives and check out the discussions at www.swedishclassics.com's Q & A Board. Lots of good stuff from knowledgeable people there, as well as an occasional bit of claptrap. I'm mentioning this now because, in the interest of relative brevity, I'm going to try to avoid going over the stuff that is available elsewhere. I'm also assuming that you are familiar with the drill for taking down and putting up a transmission. If not, any one of the repair manuals will tell you. However, rather than just releasing the forward hanger clamp on the exhaust system, take down the forward muffler as well. It will probably be easier to do that by disconnecting the exhaust pipe from the manifold. All right, let's get to the nub of this matter. You are going to need an M41 gearbox with an overdrive unit. M41s came with D-type overdrives through 1968. Thereafter, they came equipped with J-types. You'll find M41s with D-types and J-types in Amazons and 1800s, and only J-type M41s in 140s, and in 240s until 1975. J-types are, reputedly, sturdier and more durable than D-types, and spare parts for them are more readily available. I also understand that they are bulkier than the D-types, and, therefore, require a bit more tunnel modification. I have heard of D-types being installed in PVs with the tunnel simply bulged out with a small hydraulic jack. I have also heard that it is not advisable to use 1974 and 1975 M41s in PVs. This has something to do with gear ratios, which I won't go into because, frankly, I haven't puzzled it out for myself yet. I opted for a J-type and found one for a very reasonable $100. The gearbox came with the cover from an older model and was nonfunctioning, but, after reading the VClassics articles as well as the gear box repair sections of the 544 shop manual and the Haynes 140/160 manual for good measure, I felt fairly confident I could cure its ills. The problem turned out to be a bad synchronizer clamp spring, which was an easy fix. I opened up the O/D unit and, finding nothing that was obviously wrong, I replaced the O-rings, seals and gaskets. You can get these from Duane Hoberg (ODguru@kc.rr.com) Your local Uncle Olaf's can also get them for you, but you need a knowledgeable and willing person behind the counter to find the right bits and pieces. Duane knows exactly what you want, even before you do, and will send you exactly what you need.
 As you do your homework, you'll come across many warnings about the consequences of the engine's not having been turned off with the overdrive engaged or the transmission in reverse. Excellent advice that should be heeded, but when you get your tranny from a junk yard, who knows how the engine was turned off? I had no problem separating the O/D unit from the gear box, most likely because the thing had been sitting around for a decade or more, and any internal tension that could hold them bound together had long since dissipated. I worried about it, though, before I got lucky. Dave Rauch advised me that if I ran into separation problems, I should click the solenoid repeatedly, and if that didn't do the trick, to rig a hefty slide-hammer to the output flange and engage in vigorous exercise. Prices of M41s, plus J-type, can run as high as $900, depending on condition and warranty. A top price unit should have at least a three months' warranty. A reasonable price for an "as-is, no-guarantee" junk yard unit would be around $300. When you find one of those, try to shift and turn the gears and the O/D unit to check for crunching sounds and out of true in and output shafts. A locked or noisy box can be repaired, although you should get it for a token payment, if not for free, but a bent shaft is just too much of a hassle, unless you can get several busted boxes cheap to mix and match parts. Try to find a box with a top on which the slots in the shift lever neck do not show excessive wear, unless, of course, the one on your old M40 is in good shape. Worn out slots are nearly impossible to repair, and can make an otherwise perfectly good box hard to shift. Check out the solenoid by grounding one terminal and touching the other to a battery and listening for a distinct click. Then remove it and give it a good shaking as you listen for a clear rattle. No sound, or muffled clicks and rattles mean sick solenoids. You'll need a 1" open-ended wrench, ground down to about 1/4" thickness and opened up 1/32" to make it fit the 26mm hex on the solenoid. This removing, shaking, and listening exercise is well worth the effort because solenoids are costly -- about $170-200 new. Fortunately, they are also pretty near bulletproof, so, chances of finding a live one are pretty good. A Volvo specialist would charge about fifty bucks for a good used one. In a general automotive salvage yard you might find one for less. There are aftermarket, new solenoids available, but reports about their reliability are not encouraging. So, if you need one, plunk down your credit card and get one from Volvo, or go hunting for a used one. If you can't find one on your own, try Duane Hoberg. If you are not in a hurry, join the Round Fender Register (www.roundfender.org), a nonprofit organization for vintage Volvo owners that distributes parts to its members at cost. Transmissions are heavy and need to be crated and shipped road-freight, which can add a hefty sum to the base price. So, if at all possible, try to find one as close to home as possible. Picking it up yourself can save you a small bundle. I assume that you will continue to want to use the original, direct, long shifter. I have heard that the remote, short shifter can be used without having to relocate the hand brake, but I've also heard the opposite. So, frankly, I don't know, and I didn't want to complicate my life unnecessarily. Besides, I like the long shifter. It is honest, straightforward, and has character. If the unit you acquire comes with the long cover for the short shifter, and you don't want to use it, no sweat, you can use the cover from your old M40. This cover will, of course, not have the fourth gear contact switch in it. But that's not a problem either. The cover has a sort of P shaped embossment on it. You can drill and tap a hole in the loop of the P. There is a reinforcement ring molded into the cover below that. For accurate centering, drill from the inside. Sometimes there is a plug there that you can simply punch out. Volvo still sells the switches. I'm not sure of this, but they may come in different lengths. Get the shortest kind. Mine was too long and collided with the hunk of steel on the third and fourth gear selector rail that trips the switch when you select fourth. (This may have had something to do with the fact that the cover was not original with this box.) Since the switch could not be shortened and the thread on the switch is too short to allow the use of a spacer, I hacksawed 3/16" off the tripper block. That worked fine. By the way, if you are like me when I started this, and can't tell a J-type from a D-type unless they are lying side by side; the J-types always have a rectangular, ribbed plate on the under side, and the D-types always have a 3 3/8" diameter output flange. Of course, they both have their identification labels, but these are often so corroded and crudded up that they are impossible to read, particularly, when you are lying under a junked car while ants crawl into your collar. One more bit of arcane knowledge about D-types and J-types; they are not interchangeable. You can't put one on a gear box that came with the other. At least, so I've been told. My M41 reportedly came out of a '70 or '71 140 and had a 3-3/4" diameter output flange which, of course, did not mate with the 3-3/8" flange on the drive shaft of the '62 544. Earlier J-types had the smaller flanges also, and it might be just as well to look for one of those because, although the smaller flanges fit on the units that came with the larger ones, they can be tricky to come by. Volvo no longer stocks them. I paid $60 for a used one and considered myself lucky to find it. The one on your old M40 won't fit either, so then the other alternative becomes having a drive shaft shop weld a larger U-joint and flange onto your drive shaft when you have it shortened. If you need to go that route, take the output flange along. The hole pattern may not be what they are used to. One more caveat: and, again, I'm not sure of this, but you may run into some difficulty fitting the larger flange through the opening in the shaft bearing support. Some grinding to enlarge the hole may be required, and there isn't much room there to get a grinding tool into. Oh yes, the smaller flange is also 1/2" shorter than the larger, so, when you measure the transmissions to know by how much to shorten the drive shaft, do so after you know what flange combination you'll be using. Precise measurement is critical here because the shaft bearing hanger doesn't allow for much error, particularly of the too short kind. You'll be shortening the shaft by about 11-1/2" to 12", depending on the flange combination you end up with. OK, you have your M41 + O/D in tiptop condition, either because you spent a lot of money to acquire one, or because, with the help of Phil, Lee, Cameron and all the other good folk that hang out at VClassics, Swedishbricks, Brickboard, and Swedishclassics, and a bunch of other great sites you can get to through the VClassics links, you've put in some sweat-equity. (I mean, it's got to say something significant about old Volvos to have so many people gabbing about them in so many places all over the world.) You've taken down the old M40, hopefully without squashing your fingers as it crashed to the floor. Now comes the moment of truth, the moment of no return, the moment to reflect one last time on the fact that if your car represents $5000 in antique value beyond its value to you in fun and transportation, your next step is going to blow those five grand. The time has come to commit tunnel surgery.
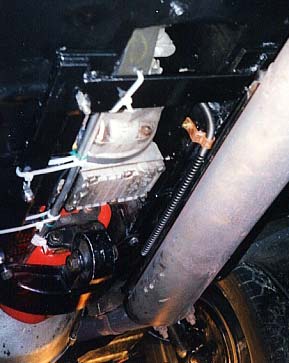
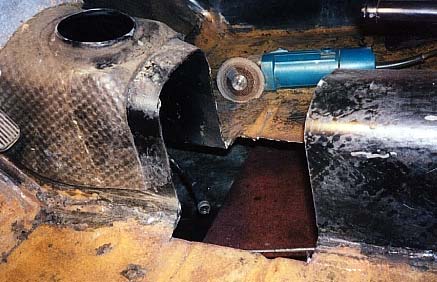 To make the M41 fit, I cut out a chunk of tunnel 8-1/4" long starting 2-1/4" aft of the shifter hole and 1-1/2" into the floor boards on either side. I also cut the floor of the remainder of the tunnel back to where the emergency brake bracket attaches to it. This was a frightening undertaking, but once the operation had been completed, I got over it -- I had no choice but. That's the nature of irreversible events. If and when you do this, make sure that you have moved the gas and brake lines out of reach of the cutting tool. I disconnected that section of the gas line completely. The brake line, being thinner, was easier to pull out of harm's way. I performed the tunnel surgery, and cut up the bar stock for reinforcing the tunnel and floor boards, with a 4" angle-grinder and a stack of cutting disks. I'm very fond of that little grinder. It lets me get into relatively tight spaces. It does a great job making my gobby welding look acceptable, and in boat carpentry it's handy for shaping the ends of pieces of timber to make them fit together nicely. Not for nothing is the tool known in these parts as the "Boothbay Harbor Block Plane." When you are through cutting, please take a file and round off all the raw edges. Frustrated initially in your efforts to stuff the beast up into its cave, you may be tempted to slit your wrists. It would be imprudent to have the means to do that so enticingly available, especially as you will succeed if you persist. Now, if you think that taking down M40s and hanging them back up again was fun, wait till you do it with an M41 with the O/D attached. Blessed is the rare home mechanic who has a lift or a pit in his garage. We less fortunate folk perform incredible feats of dexterity in the prone position in eighteen inches of vertical space, as our significant others wear ear-plugs and young children within earshot squeal with delight at the color of our language. I suppose one doesn't have to hang the whole contraption in one piece, but I was so proud of having all the components back together again, and in the right order no less, that I didn't have the heart to separate them again. Besides, what assurance had I that I would get lucky a second time? So, with the help of a floor jack and a bottle jack, up it went. Well, not quite. You can lift it onto a floor jack, or even a transmission jack, if you had one, but then there is not enough height between car and floor to slide it under; at least, not in my garage and with my lifting �equipment. I could have gotten taller jack stands, or raised the ones I had on cribbing, but then my floor jack would not have had enough reach to lift the transmission high enough. So the only solution for me was to slide the transmission under the car and then to try to lift it onto the jack. Anyone who can do that from a prone position is a better man that I am, Gunga Din. (I mention this so you'll give this situation plenty of forethought. It deserves it.)
Before you attempt to thread the input shaft through that jiggly throw-out bearing into the pilot bearing, skulking in its black hole barricaded with angry splines behind the visually impenetrable shield of the clutch, please make sure your box is in gear. Your attempts to make the splines on the shaft mesh with those in the hole will be so much more effective. When you get to putting the bolts that attach the gear box to the bell housing back in, you'll appreciate why you had to cut as much as 1-1/2" into your precious floor boards. You will eventually succeed, but not until you've dragged out every extension and swivel in your tool kit. Wobble extensions are very helpful, and thin is better than thick. My dearest possession for this kind of work is a 3/4" piece cut off an 8mm Allen key. Once I have wiggled that into the socket in the bolt head, I can get my other tools to latch onto that to tighten the bolts. I also use one of those extension grabbers, you know, the ones with a plunger at one end, which, when pushed, makes a chicken foot emerge from the other. With that and patience, I can get the upper bolts into their holes and started. On a good day, I can even get them screwed in to the point where it only takes a couple of turns with a sturdier tool to tighten them. Sometimes I grab the hex bit with it to the same effect. Before I tackle this chore again, I'm going to braze an 8mm socket to a sturdy, flexible shaft, like the spiral housing of my extension grabber or a piece of speedometer cable housing. Maybe I'll make up a second one with the hex bit brazed directly to the flexible shaft. That would provide a bit more stability for carrying the bolts to their holes.
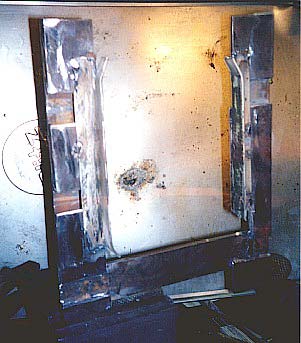
I'm sure you know that the tunnel is structurally significant in 444s and 544s -- less so in 445s and 210s, which have chassis. I have yet to hear of a PV folding in the middle after a transmission transplant, but I would hate to be the first to have the honor of making news that way. So, putting some strength back into the structure seems prudent. There are, no doubt, many ways of going about this, but here's how I did it. First I cut pieces from 1/4 x 2" flat-bar to fit into, and level out, the spaces between the ribs stamped into the floor boards. Next, I welded a 15" piece of 1/4 x 1-1/4" flat-bar to these, flush along one edge, to tie the pieces for each side together on what would become the down side. With its standing edge flush with the other edge of the lined up pieces of 2" flat-bar and on what would become the up side, I welded an 8-1/4" piece of 1" angle iron. This would fit up through the cut out areas of the floor to form a lip to which the tunnel replacement section could be attached -- one for each side, of course. I connected the two welded-up strips with another piece of 1/4 x 2" flat-bar that would bridge the open tunnel bottom so that the sides of the upright lips of the angle iron that face each other across the open tunnel bottom would be about 8" apart. This bridging strip was welded on about 1-1/2" from the aft end of the contraption, so it would not obstruct access to the speedometer cable connection nor to the drive shaft flange bolts. I drilled holes for six 5/16" bolts in the reinforcement piece and the floor, dropped the bolts through -- two large fender washers under each head -- and put on lock nuts from below. For the tunnel replacement piece I used a 20 x 12" piece of 18-gauge sheet metal rescued from a scrap yard. I bent it into tunnel shape over a piece of 2-1/2" pipe clamped in a vise so that it would be about 8-1/2" broad, and trimmed it so it would be about 1/2" higher than the original tunnel. I then cut about 1-1/2" slits into the edges of the arch of the replacement piece, and bent the resulting tabs down about 1/2", and the outer 3/4" of the tabs a bit up again, so they would be approximately parallel to the top of the tunnel. The ends of the vertical portions of the filler piece were bent into approximately the same shape. Take all these measurements with a grain of salt, because I really just sort of eyeballed the whole affair: The same goes for the reinforcement frame. In my setup, I had to bend the bottom edges of the replacement piece back in a bit to get them to make contact with the angle iron anchor piece. Therefore, that section of tunnel is actually narrower at the bottom than at the top and sides, but at the maximum bulge in the O/D unit, I ended up with about 1/2" clearing between it and the tunnel sides. After much bending, hammering, and trimming -- interspersed with multiple fittings -- I brazed the fringes of tabs together. I went the brazing route, using a portable Mapp Gas / Oxygen torch outfit, because I don't own a welder that can handle thin stuff. Silver solder might also have worked, but brazing is a better gap-filler. Tying all those pieces into a solid whole is important because you want to restore as much rigidity to that tunnel as you can, particularly if you want to make the replacement piece removable, as I did. If you don't want removability, I suppose you could spot weld, or rivet, the tabs directly to the original tunnel.
Now for the electrical part. Before you hang the transmission, do yourself a favor: make up the connection between the fourth gear contact switch and the solenoid -- 14 gauge wire should do the trick -- and attach about eight feet of the stuff to the other switch terminal. Once that tranny sits there inside its tunnel, it will be impossible to reach that switch unless you own a well-trained spider monkey. No, not even through the shifter hole -- you'll have to lower the transmission first, and that is now a much bigger job than it used to be with the old M40. In fact, I may still just cut an access hole in the tunnel directly over the switch. There are a number of ways you can wire the O/D. Dave Rauch recommended that I use the headlight-flasher-cum-high / low-beam terminal on the turn signal switch, which usually goes unused on PVs imported into the U.S. This requires using a headlight relay from a 140 or 240. If you want to go this route, look for the middle terminal on the turn signal switch, the one that makes contact when you pull the stalk toward you. Sometimes it is empty, and sometimes it has a gray wire attached that dead-ends before it gets to the headlights. Mine had the wire.
The terminals on the relay are numbered. Number 31b gets connected to to above-mentioned switch terminal or its wire. A positive power supply goes to number 15. This makes up the operating circuit of the relay. You can connect either 56a or 56b to the other terminal on the fourth gear contact switch on the gearbox. Number 56 should also be wired to a positive power supply, and, since it powers the solenoid, this wire should be fused for 25 or 30 amps. Well, there you have it, folks, except for putting everything that was moved out of the way back where it belongs. Spring will reveal if the operation was successful. We are now in the beginning of February, and it's a bummer to have to wait that long, but there's always the snow plow to fix, again... and again.
Postscript: What would I do differently if I were to do it again? Well, a neater, and probably sturdier, arrangement for attaching the reinforcement frame would have been to use two pieces of 1/4 x 1" flat bar, tapped to receive the bolts coming up from below, rather than the fender washers and lock nuts. I may still make that change some day. I would also make the frame a little wider, so that I wouldn't have to bend the lower edge of the tunnel replacement piece back in again. A 1/2" wider reinforcement frame would also allow the speedo cable to take a gentler bend. I might also try to make the reinforcement frame completely out of angle iron and keep it inside the car, fitted along the tunnel to floor joint, and bolting a piece of 1/4 x 1-1/2" stuff to it from below to bridge the tunnel gap. This would avoid interference with the muffler heat shield, make it easier to accommodate the speedometer cable, and allow the transmission to be lowered without first having to remove the reinforcement frame. Only the bridging strap would have to come off. While you are doing your homework, you'll come across an incredible variety of opinions about what kind of lubricant to put into the M41, many of them accompanied by horror stories about leaks, blown seals, and disintegrated O/D units -- each disaster, of course, attributed to a different potion. Finding myself getting more and more confused and discouraged, I plunged for Mobil 1, 75W-90, Synthetic Gear Lubricant and then looked for reassurance from Duane Hoberg, who promptly gave it. So far (about 20 miles), no signs of distress from Messrs. Laycock and de Normanville's ingenious gizmo.
Update:
Editor's note: Thanks to Bob for an excellent article. I do wish to add a few comments.
|
 Oh, I admire a lovingly restored PV or Amazon as much as the next guy, and I can even understand why some live on trailers, but to me the joy of owning one of these pieces of old Swedish iron is simply in taking it out on the road. If it breaks, well, yes, that's too bad, of course, but it's not a tragedy. It can be repaired or replaced at a reasonable cost. And if messing with its originality increases the driving fun, then there's no better reason for messing with it. So, there you have it, for whatever it is worth, my philosophy on owning old Volvos and my reason for going for an overdrive.
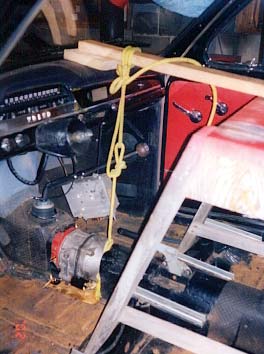 My solution was to put a saw horse in the passenger foot-well. Rest a piece of 2 x 4 with one end on it, and the other on the dash pad. Then I attached a rope to the transmission at approximately the balancing point, brought the other end of the rope up through the opening in the tunnel and, with a trucker's hitch, over the 2 x 4. That way I could lever the tranny up high enough so that I could maneuver the floor jack under it. From there on, I could raise the thing with the jack, and with additional levering, taking up the slack with the truckers hitch, give it some more lift and keep it from crashing to the floor if it slipped off the jack. Then and there I decided that I would make my tunnel replacement piece removable, so I could enjoy the fruit of my ingenuity whenever I would have to repeat this exercise.
 Once you've got the transmission in place, you will notice that the speedometer cable drive socket sits so close to the side of the tunnel that it will be impossible to attach the cable. Rather than extending the gap in the tunnel, I made a 1-1/2" cut into the angle where the tunnel side meets the floor board at a point 1/2" aft of the speedometer cable drive. Then I cut the angle open and folded the resulting tabs into the tunnel to gain the necessary space. When you rehang the muffler, you'll see that the speedometer cable is going to come awfully close to the muffler as it negotiates a pretty tight curve in limited space. To give it a better chance of survival under those conditions, I doused its innards with a mixture of anti-seize compound, lube oil and a bit of kerosene. While we are on the subject; you'll need the speedometer cable from a 1963, or earlier, 122 with overdrive, part #668598, if the upper connector on your old cable is smaller than the one at the bottom. If they are both the same size, you'll want the later cable, part #670505.
 Later on I realized that the protruding nuts and bolt-ends would interfere with the muffler heat shield, and reversed the bolts on the muffler side. I tapped three screw holes into each of the upright portions of angle iron to receive the 1/2 x 3/16" round head machine screws I used to anchor the tunnel replacement piece.
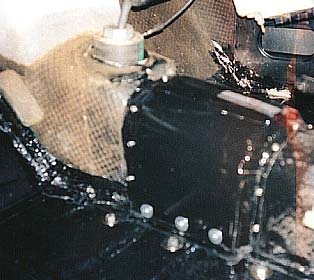 When all fitted as well as I could get it to fit, I screwed the replacement piece into place, first with nine self-tapping screws at each end, and then with the three machine screws on each side, at the bottom. Where the edges of the replacement pieces touch the original tunnel and the angle iron, I lined it with some strips of roofers' water and ice shield, which I also used to replace the sound-deadening felt I had stripped off. Gaps were filled with epoxy putty and automotive window sealant. It looks, feels, and sounds pretty solid. We'll see how it stands the tests of time and use. For another, much more elegant, way of doing the tunnel job, check out Jim Monnastes' "A PV & OD" at
 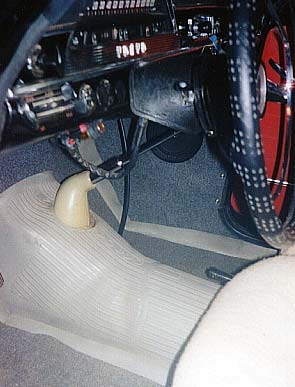 That relay is noisy, so, if you mount it on the firewall, as I did, and you are not into percussion, put some rubber behind it. Otherwise, I would suggest you find a home for it somewhere forward in the engine bay. I attached a small, yellow light (wanted green, but couldn't find one) just under the dashboard in one of those rubber-clad wire clamps parts stores sell in bubble packs, and wired it to the positive terminal of the solenoid. Mounting the light this way, I didn't have to deface the dashboard with another hole, and it is visible but not intrusive.