
|
Archive Index | Current Issue | |
|
|
||
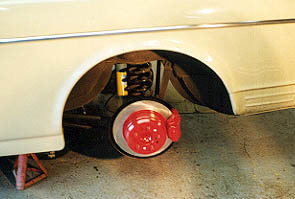
Cameron Lovre volvorelix@yahoo.com This is a subject we've received several questions on, but haven't had first-hand answers to until now. Recently, we did receive a well-composed letter from a reader that outlined the process he went through to convert an early 1800 over to accept the brake system from a later 1800, which delineated the necessary modifications to the suspension components that would allow the axle to be mounted in the car without making changes to the car or to the axle themselves. There are a few reasons I've wanted to do this upgrade to my own Amazon, a '68 model. First, the half shafts used by Volvo were tapered and prone to breaking under hard use (not much fun to lose one of the rear wheels while rounding a tight corner). Second, disk brakes allow easier maintenance than drums and new components are readily available. Third (and not directly related to which axle is in the car), I wanted a limited slip differential. This is a fairly involved procedure, but on a 1968 model, requires no modification of any suspension components, brackets or other hardware. Please be aware that even though the '67 and later models use the same attachment points on the underside of the car, the bushings and trailing arms are not the same. Interchangeable between years '67 and later, but not identical, '67 used its own variety of bushing that was not shared with any other model year. The other detail that makes this pretty easy on a '68 is that this model year used a wheel cylinder that no other model year used, and the hydraulic fitting on the hard line which runs from the junction block on the original axle will correctly interface with the rear calipers on the new axle. We're only going to discuss aspects of the installation which required a higher level of attention than simply "removing and replacing the rear axle." I will assume that this is something you're already comfortable approaching. You will need the following:
You might like to also have these items:
Starting with the items listed above, we first painted the new axle, hubs on the rotors and calipers. While the paint was drying (which is a painfully slow process, by the way), we executed step One: Remove Axle. Before loosening anything, support the weight of the car on jack stands and the axle on the floor jack. Next, remove the rear portion of the drive line (mark it if it isn't already, so that you can retain its balance) and the forward ends of the emergency brake cables, unscrew the flexible brake line that connects the hard line on the belly of the car to the junction block on the axle, release the sway bar (if you have one) end links from the moment arms, unfasten the lower shock mounts and, finally, remove the torque rods and trailing arms from their fitting points on the underside of the car. The axle is now free (and unwieldy); lower the jack slowly the springs simply fall out and withdraw the unit from the car. With the two axles side by side, transfer the spring seats, brake lines, junction block (and the screw that mounts it) from the old axle to the new one. You will have to bend the brake lines to get them to meet the calipers; this requires an approximate 90-degree bend in each -- the more graceful you can make these bends, the less chance of damaging the lines themselves. Of course, the closer the lines are to the axle, the less chance that they can be damaged by some odd piece of road debris. Holes or cracks are not repairable; the compromised line must be replaced. Trying to hurry will result in a trip to a shop somewhere that can hopefully make a replacement line sometime in the next however long it takes. . . Note: as you bend the brake lines, they will "work harden." This means that they'll bend fairly easily the first time and become more brittle the more you try to bend them. This is one of those "measure twice, bend once" routines. If you do break one, don't fret: the fittings are fairly common and you should be able to have a replacement made at a local auto parts shop (see above). If your suspension bushings are fairly new, you may elect to reuse them. I'd vote in favor of replacement if they've been in use for more than about 30K, as the opportunity doesn't come around very often, and driving on new bushings is really a nice experience. Either take the torque rods and trailing arms to a shop where the bushings can be pressed, or press them yourself don't try this with a vise; use a suitable press only. Okay: at this point, the new axle is ready and whichever bushings we're going to use are installed in the suspension components. Loosely attach the nuts and bolts to the fitting points on the axle and place the axle on the floor jack. With the help of an assistant, slide the axle under the car and elevate it just enough so that you can loosely install the nuts and bolts which attach the torque rods and trailing arms to the underside of the car. When each of these is in place and finger tight, reattach the lower shock mounts and place the springs in their perches atop the axle. Lift the axle up to the underside of the car until it just begins to hold the weight of the car body. At this point, the suspension is partially loaded and you are ready to do one of two things: fully tighten the suspension hardware; or add weight to the trunk and then fully tighten the suspension hardware. Some folks like to load the car heavy before tightening, the theory being that this will introduce torque to the bushings with the suspension compressed and that this torque will make the car "want" to stay low. I chose to tighten the bushings with the rear suspension loaded to the same degree that it's loaded when I drive it and called it good at that. One item we haven't addressed as yet is the Panhard rod: this is the diagonal rod that attaches the left end of the axle to the right hand underside of the body. Nifty thing, it also prevents the car from sliding sideways off the rear suspension and tumbling off the pavement when cornering. Make sure you install this too.
Next, refill the master with fluid and bleed the brakes. There are several methods and I won't promote my own as best, but a way that's worked well on this car and on others is to pressure bleed all four wheels, then bleed with the "pedal method," starting at the wheel farthest from the master cylinder (right rear) and working toward the wheel closest (left front). We like to fully bleed the whole car in this manner, and we like to do the whole bleeding process twice before calling it done. Last, we installed the drive line (make sure it's aligned), triple checked every nut and bolt, and started the engine without rear wheels and with the car still on stands, to let it idle in gear for a while. We didn't hear any bad noises and we didn't find any leaks, so we shut down, mounted the new wheels, put the car on the ground and went for our first test drive. Things to keep in mind: treat the brakes like you don't know if they'll work at all. Pretend they don't until you've had several chances to test them (away from traffic) and inspect for leaks (also best done away from traffic). The factory setting on the proportioning valve (if you have one) may or may not be adjusted properly for disks on the rear, so the effective proportioning may or may not be to your liking; this isn't a problem to panic over, but we certainly don't want the rear wheels to lock up early, and we certainly do want them to help to stop the car properly this will be something to address as soon as is possible. The original e-brake cable won't work either; time to look for one from an 1800E. The whole process is more of a "remove and replace" than an "alter and make work" exercise. The only thing that had to be changed was the routing of the hard lines atop the axle itself. Time to complete, including pressing bushings, was twenty hours (half of which time I had an assistant). I'd like to list all of the wonderful improvements that this has made in the car, but I can't. At this point, the new configuration is only a day old and has logged one hundred forty miles. What I am most pleased with (so far) is the feel of the brakes: absolutely firm without pulsing, pulling or any other Amazon brake weirdness that I've become accustomed to. The next and final two steps before this project will be considered complete are to change the bolt pattern on the front wheels to match and to get the emergency brake back into operation. I'd like to think that the car will be finished at that point, though several locals don't seem to believe that I'll ever stop fiddling (No, guys really! I don't have any more ideas!) The only aspect I haven't addressed is the overall project cost. The reason I've avoided it is that this will vary wildly: if I chose to install a used axle, re-use my old bushings, etc., I think this could be a $500 - $1000 project when all is said and done. Of course, if you decide that you want the axle rebuilt and the bushings, rotors, calipers, etc., to be new, you'll spend a whole bunch more. Whatever you decide, execute the installation with two things in mind: 1) the installation must not be rushed, and 2) work with the realization that your life really does depend on the quality of your work. Enjoy!
Update: New rotors were provided to a local race fab/machine shop; the original studs were cut and the hub surface planed smooth. The shop cut five new holes, staggered between the original stud locations, and pressed in new studs. (Short version: the OE 122 hub was modified to accept a 140 and later series wheel.)
|
 Unless something has gone really wrong, the axle is now mounted in the car. This is a good opportunity to change the brake fluid, since bleeding will be required anyway. The '68 uses a dual master cylinder, so we evacuated the rear line to the fitting that attaches to the flexible line first, then connected the flexible line (thus making the circuit complete). Making sure the bleeder screws on the rear calipers were closed, we moved to the front and evacuated the old fluid from that circuit also. If yours is a '67, it will have a single circuit master cylinder. This is fine too; same routine applies.