
|
Archive Index | Current Issue | |
|
|
||
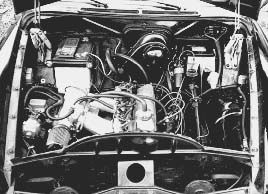
Cameron Lovre volvorelix@yahoo.com In September of 1993, the original B18 in my '63 122 finally cracked a ring and gave up for good, after more than 400,000 miles of use on the original bottom end. Oil pressure at hot idle had been low enough that the oil lamp flickered for the last several months of its life and its demise came as no surprise. I began building a replacement engine and the addition of fuel injection seemed like a good way to finish the project. The simplest way to collect the necessary pieces for the conversion to D-Jetronic fuel injection was to acquire a complete 140-series car that had been in an accident; this provided every component I needed specific to the D-Jet. I took a couple photos of the donor 140's engine compartment before getting started to use for reference later, when everything was apart. If I had it to do over again, there are a few things I would do differently, however, the overall project is not nearly as difficult as many people seem to think. It is, in fact, fairly simple and straightforward. I'm surprised it isn't more common. If this is something that you think you'd like to try, first ensure that you have all of the components specific to the D-Jetronic fitted cars: the distributor, MAP sensor, temperature senders, throttle valve switch, thermal timer, Electronic Control Unit (ECU), wiring harness (treat it with great care), throttle linkage, fuel pump, relays (some had 3, others 2), a compatible coil (not the original one with the springsteel armored cable), injectors, pressure regulator, an alternator and voltage regulator. You'll also need a handfull of zip ties, some fuel line rated for injection applications (high pressure) and some wire and terminals. Here's how I went about the installation: first, I installed the engine and all of the components that attach to the engine. These include the starter, alternator, distributor, injectors, fuel rail and the pressure regulator. Next, I put the exhaust and intake manifolds on the engine. The intake manifold clears the right side fender with less than one inch to spare. The throttle valve switch attaches to the manifold, as does the cold start injector and four wires from the harness.
Though most of the parts were simple to wire, the wiring to the relays isn't gathered together in the dandy terminal housings used by the other components; thus, I actually had to pay attention to which wire went where rather than simply plugging the wire end into the component. If you do this, make sure you get everything plugged in properly. If you let the smoke out of an electrical part, it stops working. . . Next, I drilled a hole through the firewall for the wiring harness to pass through into the cabin, on the forward edge of the firewall just below the battery. There's a punch tab on the engine side and I only had to drill through one layer of sheetmetal to gain access to the passenger compartment. I then threaded the computer end of the wiring harness through and plugged it into the ECU. The ECU doesn't fit under the seat of a 122 as nicely as it does in a 140, but it still allows footroom for backseat drivers and passengers. The electrical lead that provides power to the fuel pump emerges from the D-Jet wiring harness inside the passenger compartment, so I drilled a hole through the floor to allow this wire to pass to the underside of the car and routed it to the new (D-Jet) fuel pump mounted near the tank at the rear of the car. The fuel pump and filter both fit between the spare tire well and the gas tank, similar to their placement in the 140 donor. To plumb the pump, I first disconnected the metal line from the threaded fitting on the fuel tank, then cut approximately 3" off the end of the metal fuel line. I found a brass fitting (at an air conditioning supply store) that had threads that matched the fuel tank's fitting and had a "push on" fitting that would accept the new rubber line that leads to the "in" port on the fuel pump. I connected the "out" port on the fuel pump to the metal fuel line (original to the 122) with rubber fuel line rated at 100 psi. At the forward end of the metal line, I used more high-pressure fuel line to connect to the D-Jet fuel rail. The return line, from the pressure regulator back to the gas tank, runs alongside the metal fuel line under the car and is held in place with plastic zip-ties. At this point, the next thing to approach was the throttle linkage. I found that I needed to mix and match parts from the donor 140 and the recipient 122. The rod indigenous to the 122 that is mounted to the interior side of the firewall (the one that connects to the gas pedal directly) cannot be used; it's too long on the engine compartment side and it will hit the thermal timer mounted to the engine block. I therefore used the one from the 140, but the brackets that hold the 140 piece are too flimsy, so the metal sleeve from the 122 was needed. The final bit was to install the device which translates the lever action of the accelerator pedal (forgive my technical terminology here) to the cable action required for the D-Jet. The bracket that matches the D-Jet, taken from the 140, has three mounting holes which secure it. The two uppermost holes should align horizontally when mounted to the firewall, but the lower hole (roughly 2" below) needed special attention. The curvature of the 122's firewall is not the same as that of the 140 donor: the lower mount on the bracket doesn't make direct contact. To secure it, I used a long, thin bolt and a metal sleeve (about 1-1/4" in length) as a spacer. The spacer fits between the firewall and the lower mounting hole on the bracket, and the bolt passes through the bracket, the sleeve and the firewall. Of course, mounting this bracket required drilling three holes in the firewall. Overall, this has been a terrific setup. I initially assembled the car as a hobby, as I was in college and didn't really need it at the time. I used it for carrying laundry and autocrossing (not at the same time, though) until school was over and I became a commuter. I've been running this combination for about four years -- combined enthusiastic driving and assertive commuting -- and it's up to 65,000 miles since installation. So far, I've had trouble with the throttle valve switch, wiring connections to one of the injectors, temp sender #2 (head) and the MAP sensor. Also, because I run fuel pressure much higher than spec, I tend to go through pressure regulators a bit more often than other D-Jet cars. This setup has been surprisingly worry-free, and I spend much less time maintaining the 122 in its current configuration than I did when it was stock. Whenever possible, I have used new components for repairs with overall longevity in mind. In addition to the D-Jet, I've also installed an overdrive tranny with the short-throw shifter linkage from an 1800, a set of R-Sport springs, competition-valved Bilsteins, ipd swaybars, urethane suspension bushings and 14X6 Minilites. I would not recommend this suspension configuration for an everyday driver: it's a pretty rough ride and ground clearance is minimal (about 2 1/2" between the muffler and the pavement). Even so, the handling characteristics are certainly different from stock! The engine is a 2130cc B20 with ipd's "Street Performance" cam and 10.8:1 compression. The head has been ported and made to run on unleaded fuel. Exhaust is 2-1/4". These modifications have resulted in a fairly versatile car; with everything tuned to stock specs, it's an easy car to drive and the plugs don't foul -- at the same time, altering the timing, heat range and gap of the plugs and valve clearances can give noticeable results. There's some untapped potential in the higher revs, but low end torque is pretty important as most of its use is as a commuter. This configuration has resulted in quick and easy starting (whether hot or cold), strong power (not as much as a set of side-draft Webers will offer, though) and good economy: 29.5 highway at 70 mph (something the Webers will not do). None of this stuff is magic and nothing about it was too difficult. I would absolutely encourage anyone interested to give it a try; completely and absolutely worthwhile.
|
 Once I had everything on the engine, I connected the wiring harness to each of these components: the distributor, injectors and the throttle valve switch. The wires are numbered; this made keeping correct connections straightforward. Once the engine ancillaries were wired, I used the wiring harness itself as a crude guide to help me decide where to mount the relays and MAP sensor. The only thing that really required any special attention was to make sure I didn't mount the relays in the path of the hood hinge. I found that I had longer wires than I needed, but thought that was a better deal than having any be too short.